Key Takeaways
- The right keywords in your prompt determine whether you get a souvenir magnet or a soft sticker. Two or three words make the entire difference.
- Two prompts cover most cases: one for photos with a person and scene, one for single subjects like cafés, buildings, rides, and landmarks.
- The result works three ways: share it online, print it as a real magnet through Canva and a print-on-demand service, or save it as a transparent PNG for Notion or a digital journal.
I recently saw an AI creator I follow turn a travel photo into something that looked like a premium airport souvenir magnet, and I spent the rest of the afternoon testing it myself.
After generating dozens of images, I refined it down to two prompts that reliably show you how to turn photos into AI fridge magnets, whether you use ChatGPT, Claude, or another image generation tool. This guide walks you through both prompts, how to avoid the most common mistake (getting a soft sticker instead of a hard enamel magnet), and how to print the result or use it as a digital sticker in Notion or a digital journal.
The same kind of prompt thinking also works for AI miniature photo scenes, which turn a photo into a tiny diorama world instead of a flat magnet design.
What is the AI fridge magnet effect?
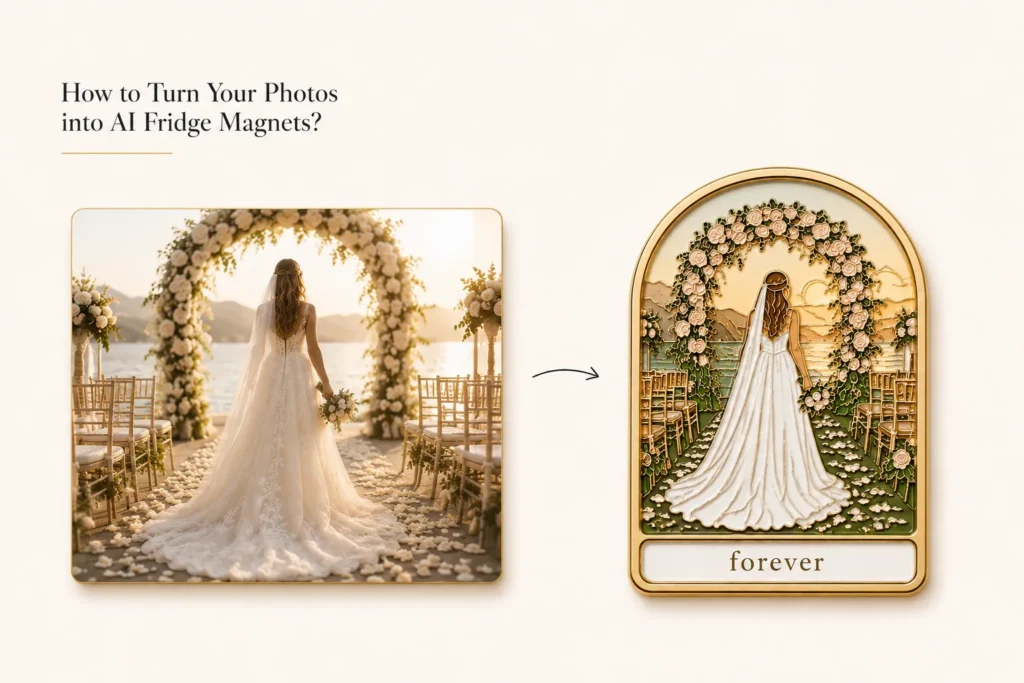
The AI fridge magnet effect turns a regular photo into a souvenir-style magnet with a hard enamel finish — the kind of small collectible you would find at an airport gift shop or a museum store. The subject gets simplified into flat color blocks separated by raised gold metal outlines, with a polished finish and a soft shadow underneath.
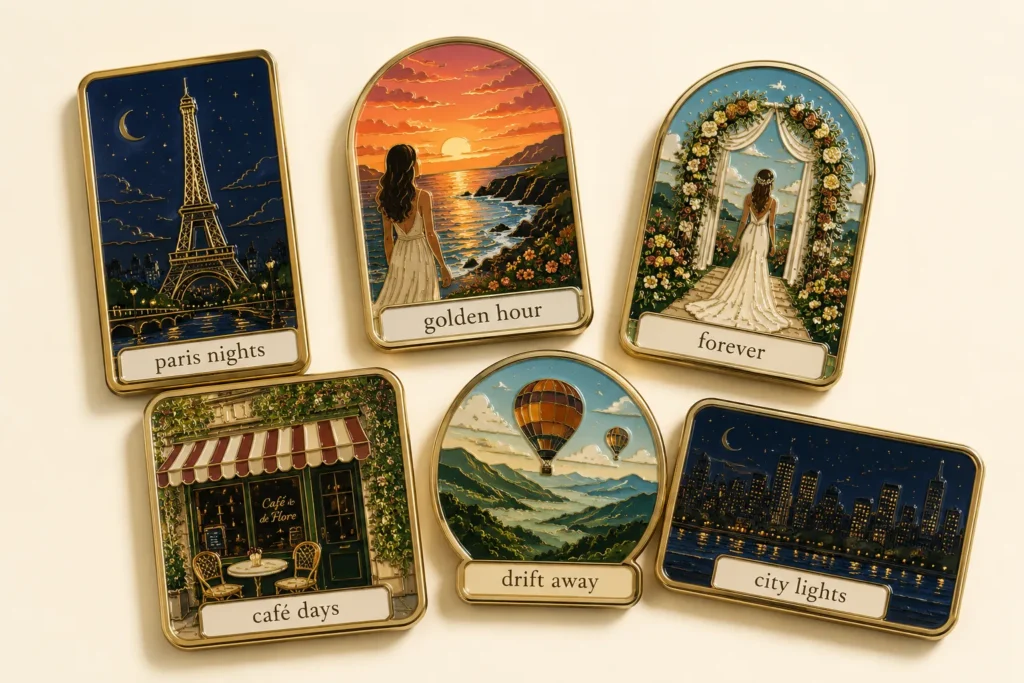
You may have seen similar edits on TikTok, Instagram, or travel content pages because the effect is easy to recognize and satisfying to look at. A travel portrait, a wedding scene, a café front, a theme park ride — all of them produce a clean recognizable magnet icon when the right prompt is used.
The one thing that trips people up: the result depends almost entirely on the words in your prompt. Use the wrong words and you get a soft illustrated sticker. Use the right ones and you get a hard enamel magnet with gold metal edges. The troubleshooting section below covers exactly which words matter.
Which photos work best for AI fridge magnets?
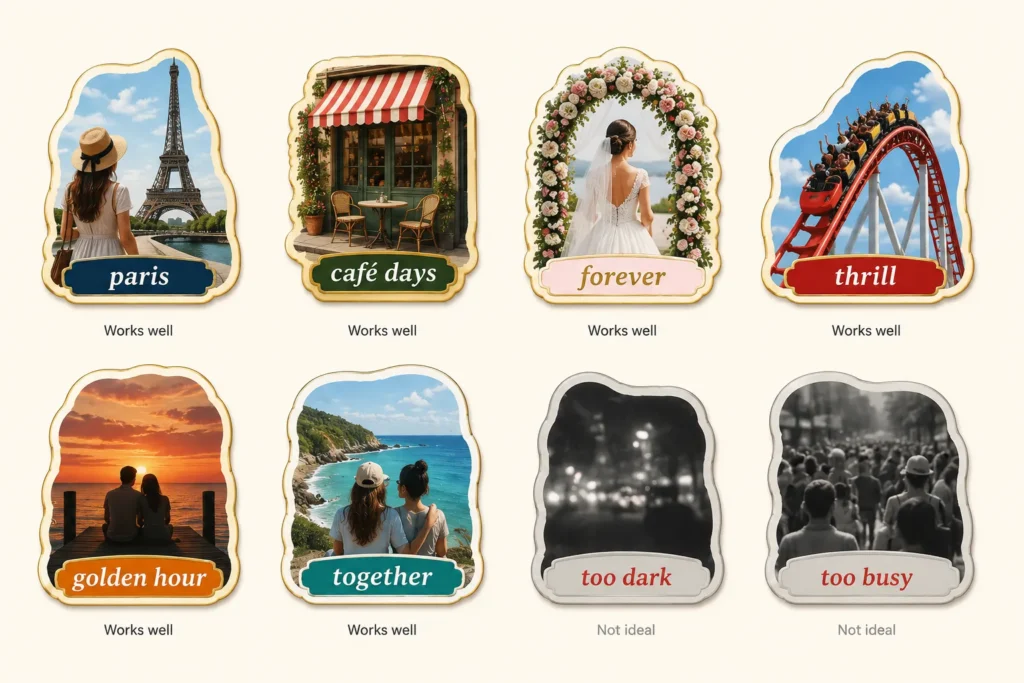
The best photos to turn into AI fridge magnets have one clear subject and strong outlines — here is exactly what works and what does not.
| Photo type | Works well? | Why |
|---|---|---|
| Person with a landmark or scene | Yes | Creates a personal travel or memory keepsake |
| Café, building, or storefront | Yes | Strong shapes and color details convert cleanly |
| Wedding or ceremony scene | Yes | Wide scene with clear subjects, great for gifts |
| Amusement ride or event | Yes | Bold shapes and action make strong icons |
| Sunset silhouette | Very well | Clean outlines produce the sharpest magnet effect |
| Couple or friend photo | Yes | Works best with 1-3 people in a clear composition |
| Dark or blurry photo | Not ideal | Details become messy after conversion |
| Large crowd with no focal point | Not ideal | The magnet looks flat and unrecognizable |
One thing worth knowing: silhouette photos are a hidden shortcut. Because the outlines are already simplified, the AI has less to interpret and the gold metal edge comes out sharper. If you have a sunset silhouette, a backlit couple shot, or a group photo against an open sky, try that one first.
What you need
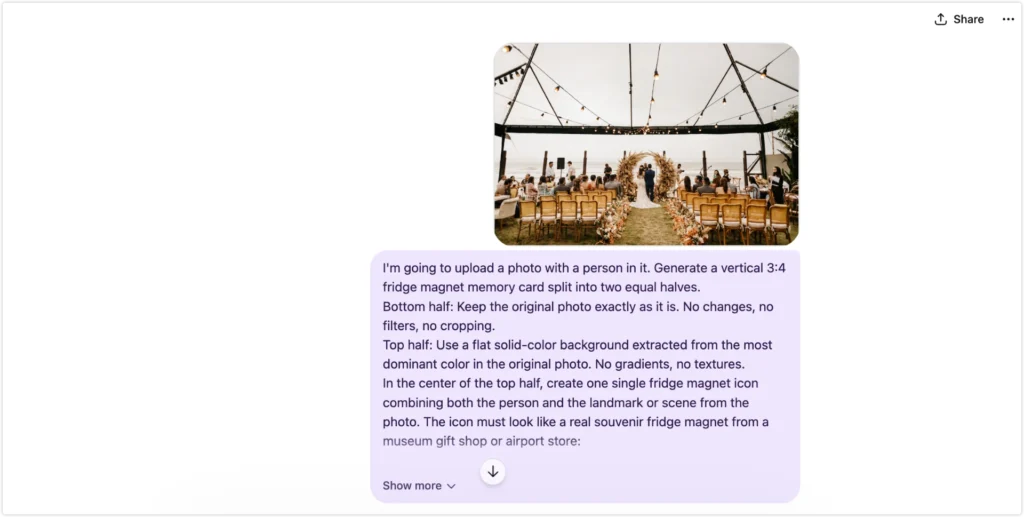
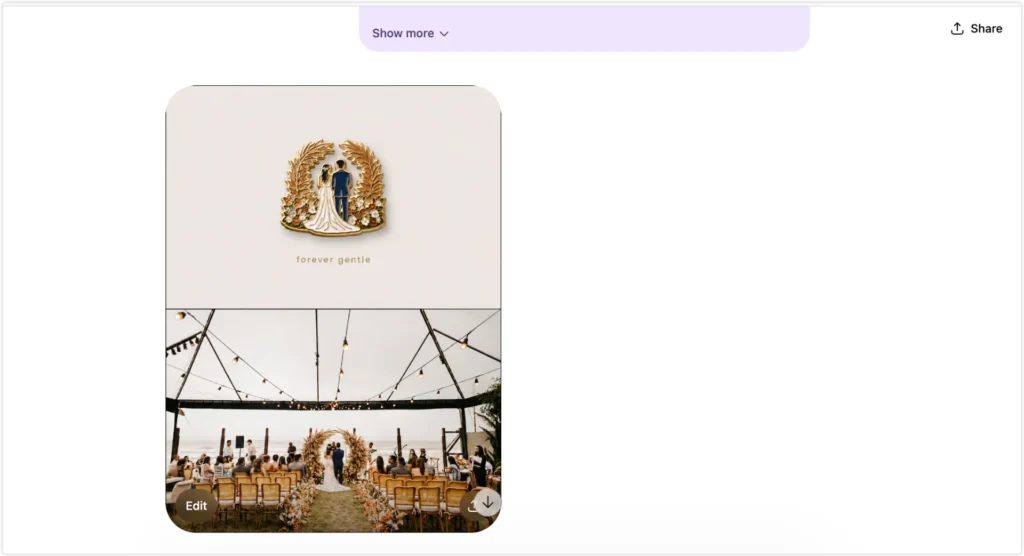
Just two things: ChatGPT with image generation enabled, and one photo from your camera roll. The free version works if image generation is available on your account, though daily limits may apply. If you want to run multiple photos in one session, check the ChatGPT pricing guide to see whether a paid plan makes sense. Everything else — Canva, Printful — only comes in if you decide to print.
Prompt 1: Person and scene
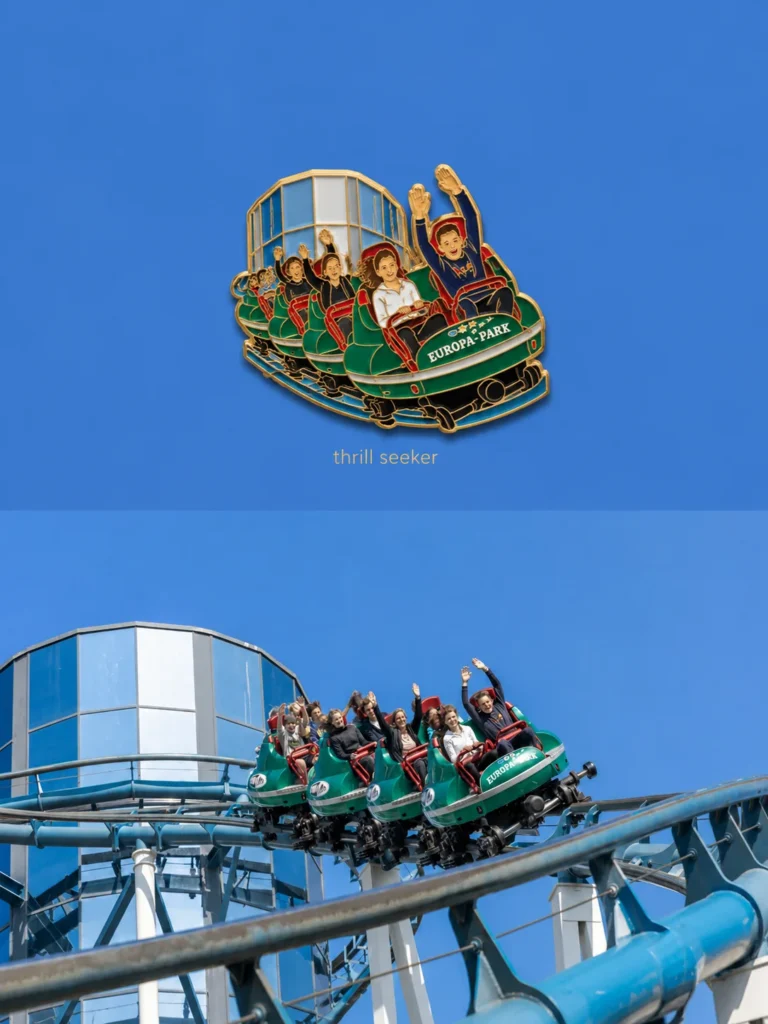
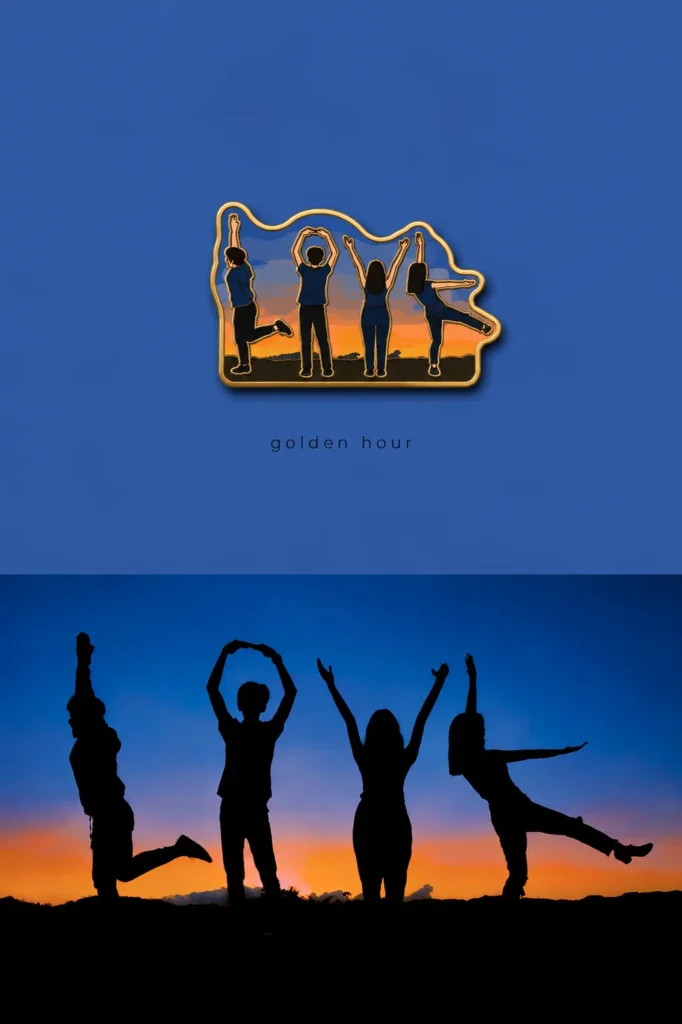
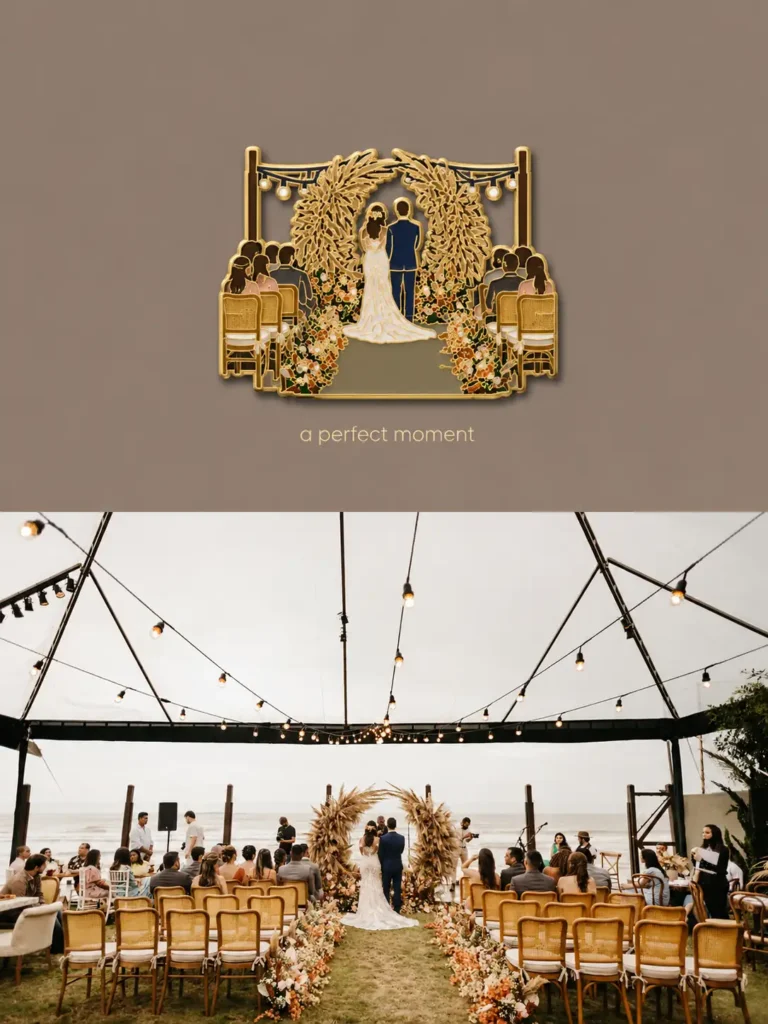
Use this when your photo includes a person interacting with a place, a landmark, a natural scene, or another person. It works for travel portraits, couple photos, wedding moments, friend group shots, amusement park photos, concert memories, and movie screenshots where the character and setting are both part of the image.
I’m going to upload a photo with a person in it. Generate a vertical 3:4 fridge magnet memory card split into two equal halves.
Bottom half: Keep the original photo exactly as it is. No changes, no filters, no cropping.
Top half: Use a flat solid-color background extracted from the most dominant color in the original photo. No gradients, no textures.
In the center of the top half, create one single fridge magnet icon combining both the person and the landmark or scene from the photo. The icon must look like a real souvenir fridge magnet from a museum gift shop or airport store:
- Style: Hard enamel pin / cloisonné fridge magnet aesthetic. Flat color fills separated by crisp gold metal dividing lines between each color area. Clean stamped metal edge. No gradients, no shading, no painterly texture, no soft illustration.
- Person: Convert the person into a clean simplified illustration. Keep their real features: hair color, outfit, accessories, pose. Reduce detail but keep them recognizable. Not chibi, not cute cartoon. Clean lines, flat colors.
- Landmark/scene: Simplify the background into a flat illustrated version of the most recognizable element. Reduce to essential shapes only. Same hard enamel style.
- Combined: Person and landmark form one unified icon shape together, not two separate elements placed side by side.
- Border: Hard crisp metallic gold outline that follows the natural contour of the combined shape. Sharp and defined, not soft or wavy.
- Depth: Subtle drop shadow beneath the entire icon for a physical lifted look.
- Size: Small and centered in the top half. The icon must occupy no more than 35% of the top half. Generous white space around it on all sides.
Below the icon, add one short poetic label in a clean lightweight font, lowercase, centered. One to three words maximum. Let it come naturally from the mood and feeling of the photo. Understated and elegant. Not a place name.
Do not add a base plate. Do not use soft or wavy borders. Do not use watercolor or realistic illustration style. Do not make the icon too large. Do not add gradients or extra decorations.
📋 Copy this prompt — upload your photo to ChatGPT, paste the prompt, and generate.
Prompt 2: Single subject
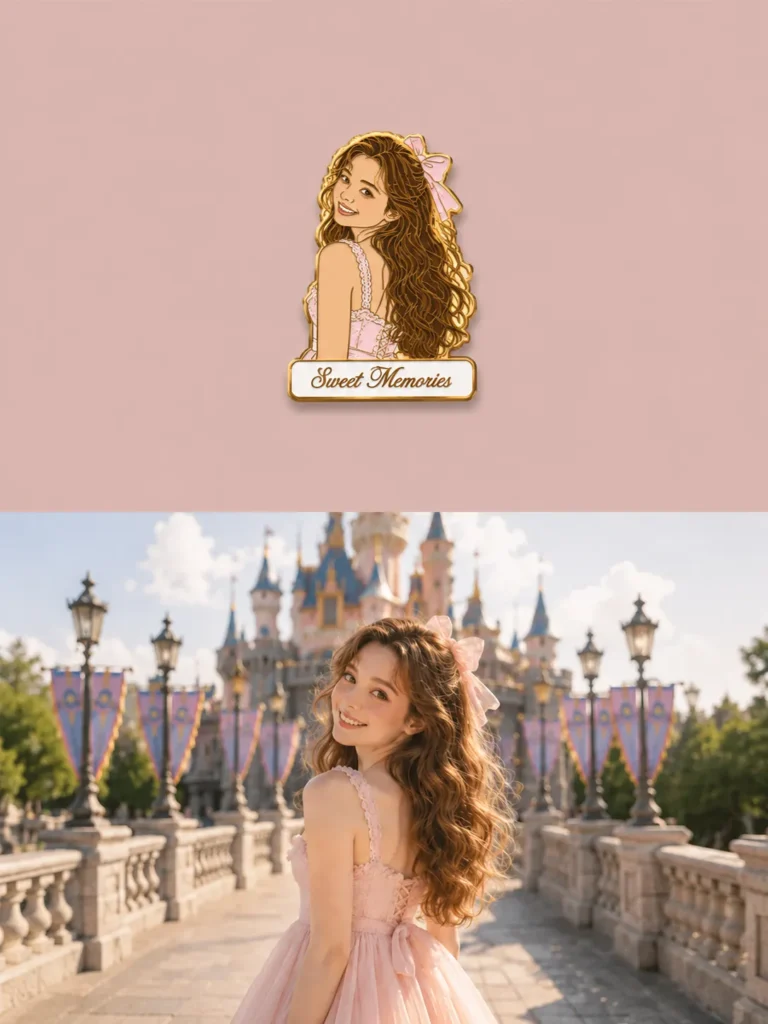
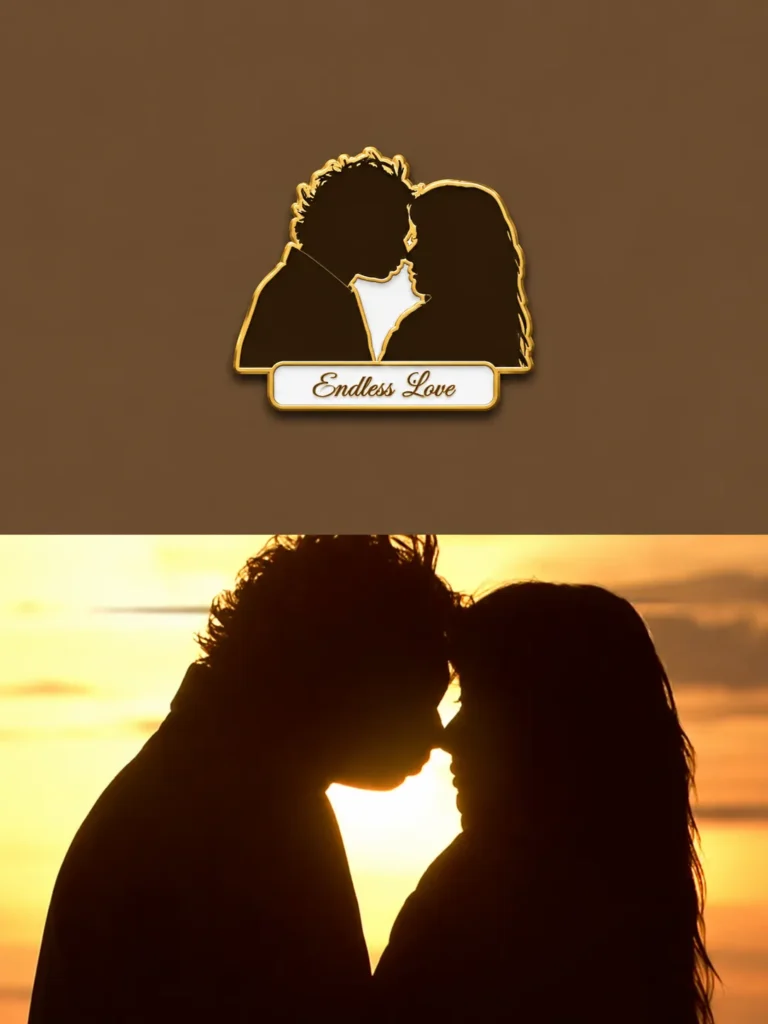
Use this when the subject is a place, a building, a storefront, or any object without a person as the focus. Cafés, landmarks, amusement rides, architecture — anything where the location or object is the whole point.
I’m going to upload a photo. Generate a vertical 3:4 fridge magnet memory card split into two equal halves.
Bottom half: Keep the original photo exactly as it is. No changes, no filters, no cropping.
Top half: Use a flat solid-color background extracted from the most dominant color in the original photo. No gradients, no textures.
In the center of the top half, extract the single most recognizable subject from the photo and convert it into a fridge magnet icon. No people. The subject stands alone:
- Style: Hard enamel pin / cloisonné fridge magnet aesthetic. Flat color fills separated by crisp gold metal dividing lines between each color area. Clean stamped metal edge. No gradients, no shading, no realistic texture.
- Subject: Keep the core silhouette, colors, and iconic features. Simplify details but keep it instantly recognizable. Do not distort or over-cartoonize.
- Border: Hard crisp metallic gold outline that follows the natural contour of the subject. Sharp, defined, not soft or wavy.
- Base plate: Add a small white rectangular base plate at the bottom of the icon. Add a short elegant label in a classic script font. One to three words, capturing the mood of the photo, not a place name.
- Depth: Subtle drop shadow beneath the entire icon for a physical lifted look.
- Size: Small and centered in the top half. The icon must occupy no more than 35% of the top half. Generous white space around it on all sides.
Do not include any people. Do not use soft or wavy borders. Do not use watercolor or realistic illustration style. Do not make the icon too large. Do not add gradients or extra decorations.
📋 Copy this prompt — upload your photo to ChatGPT, paste the prompt, and generate.
Why does my result look like a painting instead of a magnet?
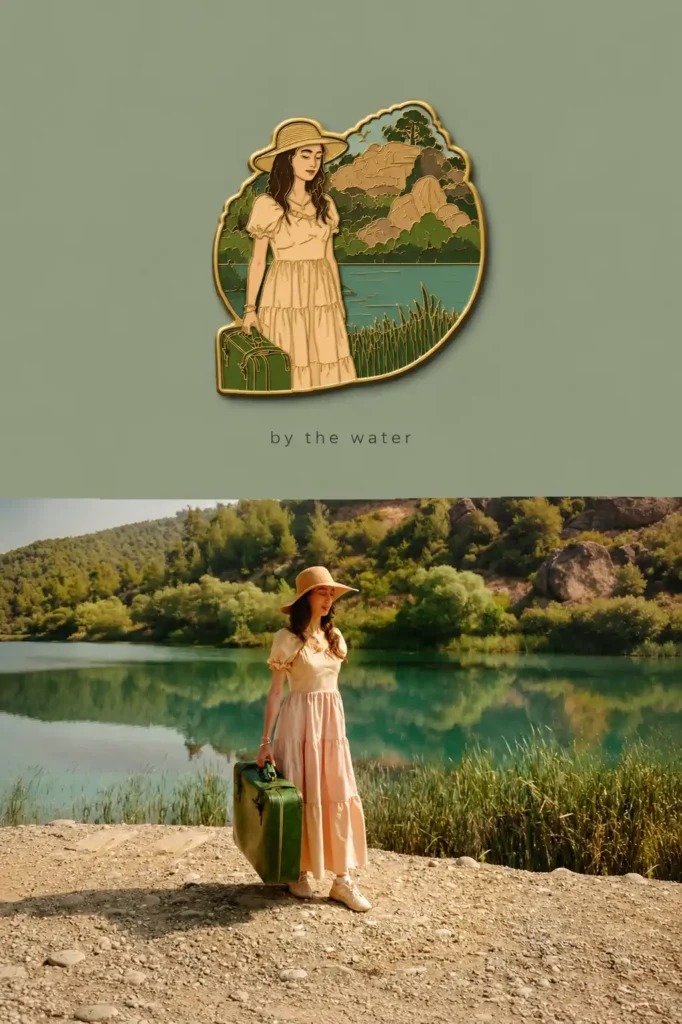
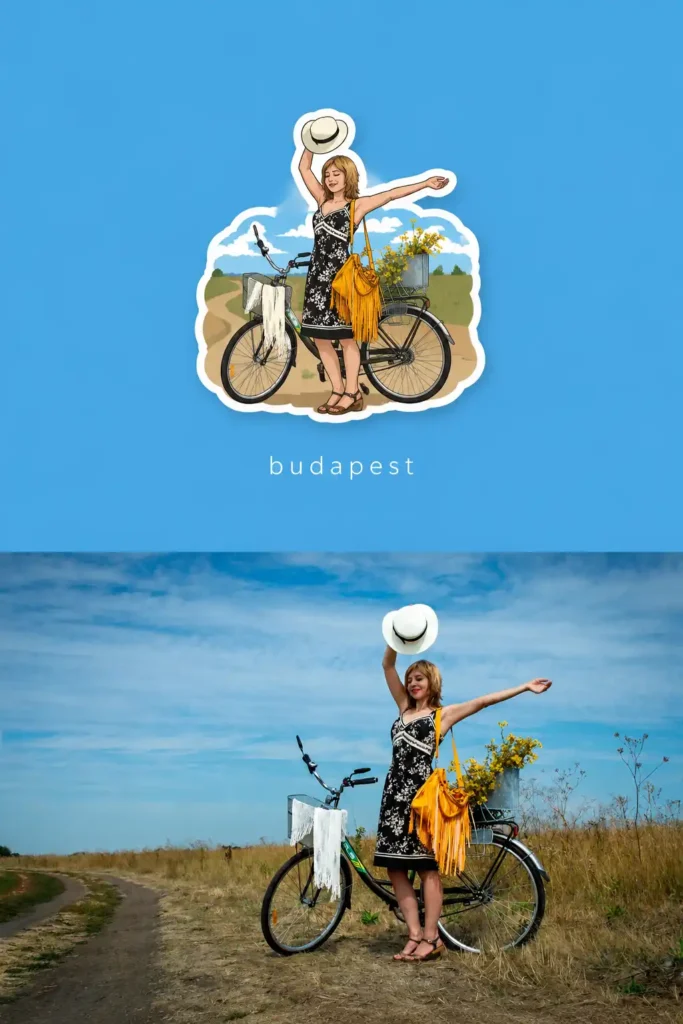
This is the most common problem, and it comes from the prompt rather than the photo. The AI defaults to soft illustration styles unless you push it in a specific direction. Here are the four fixes that solve most cases:
| Problem | Fix — add this to your prompt |
|---|---|
| Result looks like a watercolor painting | hard enamel pin, raised gold metal outline, flat color fills, souvenir magnet finish |
| White soft border instead of gold metal edge | thick gold metallic rim, no white sticker border, hard stamped metal outline |
| Too detailed and realistic, not simplified | simplify all details into flat solid color blocks, remove gradients and textures, cloisonné style |
| Label shows a city name instead of a mood word | Do not use a city name, country name, or any location text as the label |
Sticker style vs fridge magnet style
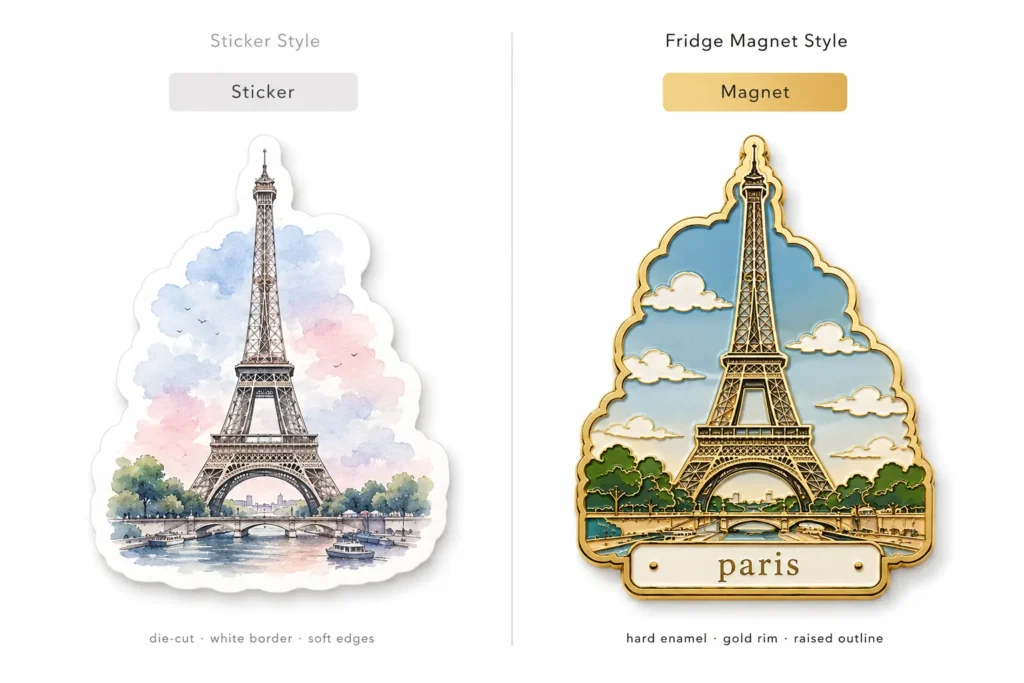
It is worth understanding the difference because the two styles look completely different in practice, and switching between a soft sticker and a hard enamel AI fridge magnet only takes a few words.
| Fridge magnet style | Sticker style | |
|---|---|---|
| Border | Hard gold or silver metallic rim | Soft white paper edge |
| Color fill | Flat solid blocks, no blending | Gradients, watercolor, painted |
| Finish | Glossy, raised, 3D look | Flat, matte, printed |
| Prompt words to use | hard enamel, gold metal rim, raised outline, souvenir magnet | die-cut sticker, white stroke border |
| Best for | Printing, gifting, travel keepsakes | Journals, laptops, digital sharing |
If you want to post on Instagram and the softer look fits your aesthetic, sticker style works well. If you want something that looks like a real souvenir or you are planning to print it, stick with the fridge magnet keywords.
How to print your AI fridge magnet?
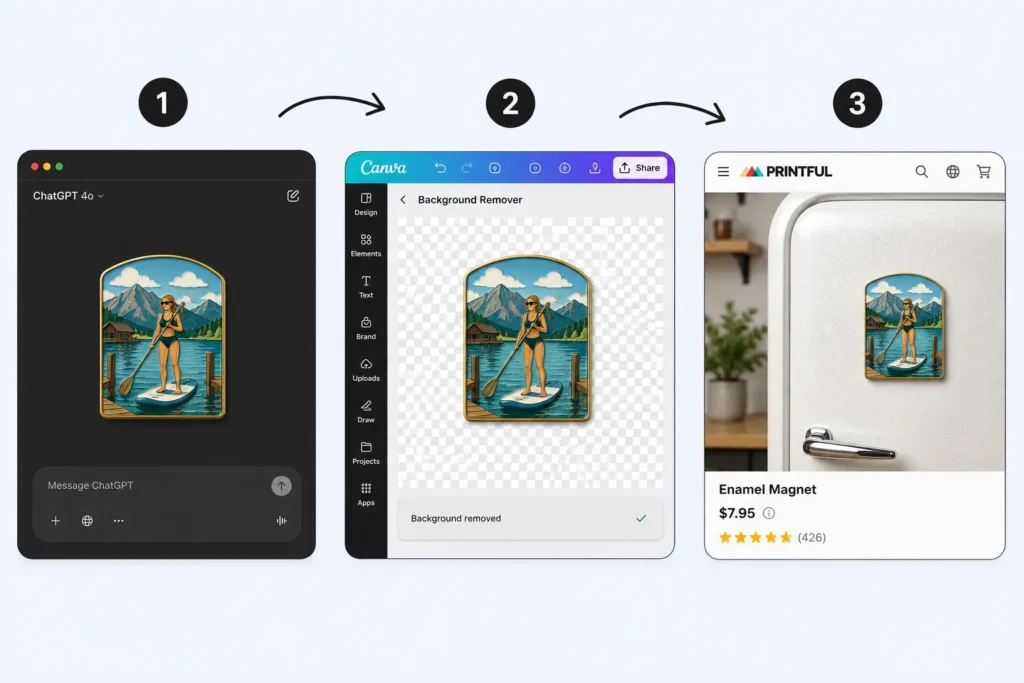
Most guides stop at the digital image, but holding the result in real life is a different experience entirely. Here is the full workflow.
Step 1: Generate a clean icon
Add this line to the end of either prompt before generating:
Place the finished magnet as a single centered object on a plain black background. No extra text, no fridge scene, no hands, no mockup.
Step 2: Remove the background in Canva
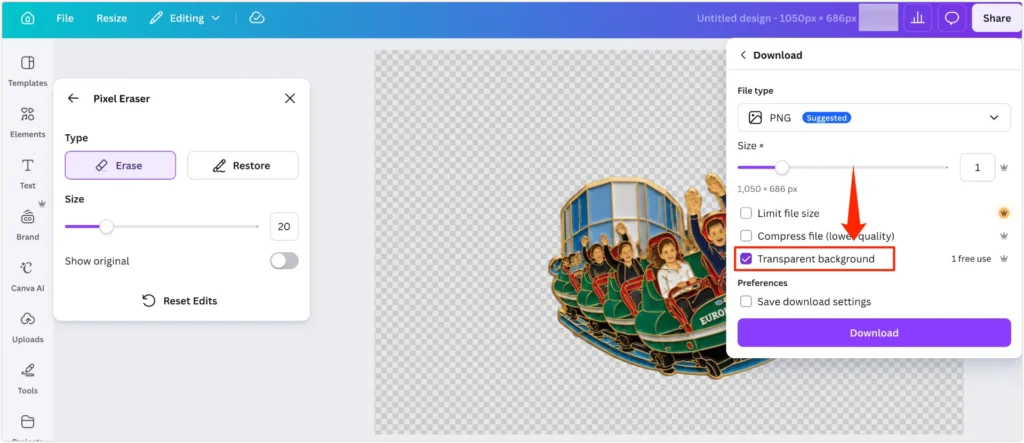
Upload your image to Canva and use the Canva Background Remover to strip the black background in one click. Export the result as a transparent PNG.
Step 3: Upload to a print-on-demand service
Upload your transparent PNG to Printful or Redbubble and select their custom magnet product. Center the design and preview before ordering. Product options may vary by country and store, so check the magnet size and file requirements before placing your order.
For size, 2.5 to 3 inches works well for a standard souvenir look. If you are making something for a wedding or a detailed travel keepsake, 3 to 4 inches gives the details more room to read clearly.
Use your AI fridge magnet as a digital sticker
Not everyone wants to print, and that is completely fine. Once you have a transparent PNG, the same file works as a digital sticker in any app that accepts PNG images.
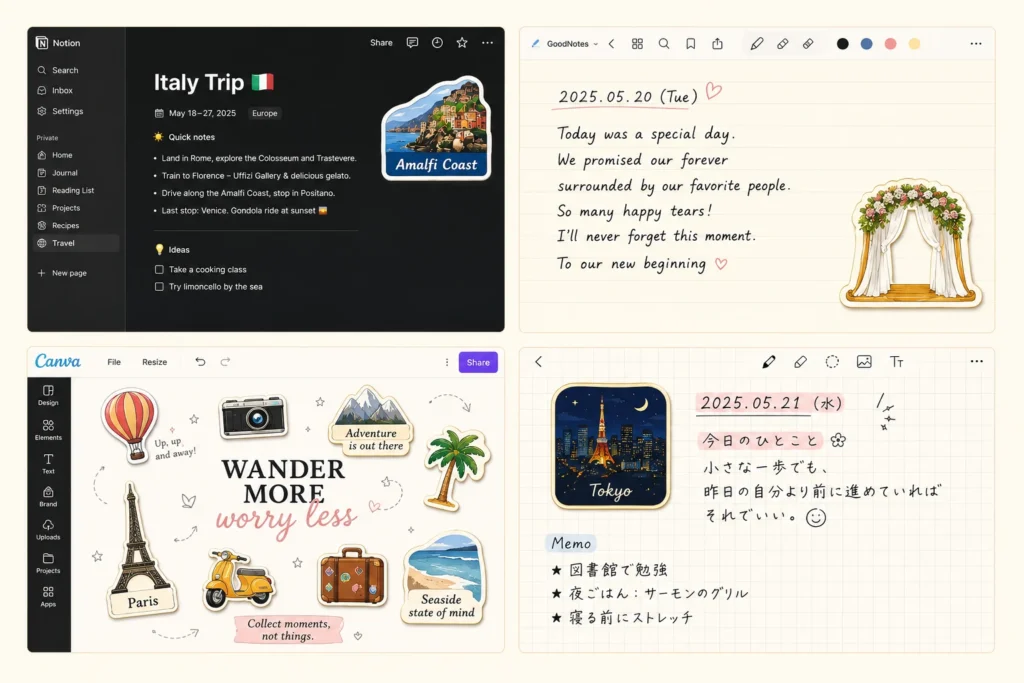
Drop it into a Notion travel page next to your trip notes, café reviews, or packing lists and it becomes a small visual marker for that memory. In GoodNotes or Notability, it sits cleanly on any journal page because the gold metal outline already acts as a natural border. In Canva, you can layer it over photos, add it to a carousel post, or build a collage from multiple magnets across different trips. If you use a digital planner, saving one magnet per trip, café, concert, or wedding moment builds a sticker library that is genuinely useful to come back to.
The transparent PNG works cleanly because the gold edge is already defined. There is nothing to crop or adjust after the background comes off.
How to Turn Your Photos into AI Fridge Magnets FAQs
Can I use the free version of ChatGPT?
The free version works if image generation is available on your account. Daily limits may apply, so if you want to run multiple photos in one session a paid plan is more practical.
Does this work for group photos?
Yes, but the results are more consistent when people form a simple shape together. Sunset silhouettes, back-view wedding aisles, and amusement ride photos convert more cleanly than front-facing portraits with many faces. The golden hour group silhouette in this guide is a good example of what a strong group result looks like.
Can I print the result as a real fridge magnet?
Yes. Generate with a black background, remove it in Canva, and upload the transparent PNG to Printful or Redbubble to order a physical magnet.
Why does the label say a city name instead of a poetic phrase?
The AI sometimes recognizes a location from the image and uses it automatically. Add this to your prompt: Do not use a city name, country name, or any location text as the label.
What is the difference between fridge magnet style and sticker style?
It comes down to two or three words in your prompt. Fridge magnet style produces gold metal edges, flat color blocks, and a raised glossy finish. Sticker style produces a white paper border, blended colors, and a flat matte look. The comparison table above shows exactly which words control each outcome.
🚀 Now you know how to turn your photos into AI fridge magnets. Pick one photo, copy either prompt, and run it now. The whole process takes under two minutes.